
A blog without images seems always incomplete. This is mainly because we are visual beings and we are used with visual imagery wherever we go, whatever we do. Moreover, we tend to better remember what we see rather than what we read or hear. It’s a fact and if you want a blog to be successful, you need to take it into account.
Therefore, let’s discuss today the most important issues a blogger has to deal with: images.
- Where to find proper visuals for your blog posts?
- How to better use these images for maximum effectiveness?
- How to deal with visuals?
Let’s talk about each of these questions and many other important questions you may have and find our answers together.
1. Why is it important to use images?
As I have already said it before, people tend to remember better what they see.
I am referring to the visual imagery of course, not the written text. It is believed that if your content is paired with images, people will remember 65% of the information you delivered to them, three days later.
After the same amount of time, they will remember only 10% of what they hear.
Also, pairing your content with relevant images helps your readers get more focused on your content. Images can be attractive and they can trigger the reader’s curiosity to read the text if they were chosen properly.
You don’t need proof for it.
Just think about how many seconds it takes for a human being to read the first paragraph. If you show them a great image, the effect is instantaneous. And yes, you need an instant emotional trigger because otherwise the audience will turn their backs on you.
Don’t forget that the attention span of an adult is now lower than ever.
Your text may be valuable but it takes more than 8 seconds to determine its value while an image attracts instantly.
2. Statistics about visuals
Now, that we’ve concluded that images are important, let’s dig a little bit deeper and take a look at the content marketing industry today.
What is the impact of the visuals?
51% of B2B content marketers admit to have been prioritizing the creation of visual content for their marketing strategies.
 Moreover, 74% of social media marketing techniques (which is also a form of content marketing), include visual assets as a lucrative strategy for achieving success.
At the same time, 37% of the marketers say that visual marketing is the most important type of content they are sharing online these days.
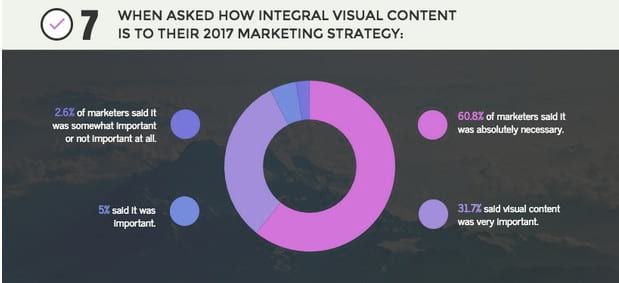
When asked how important is a visual strategy to their overall marketing campaigns, more than 60% of the marketers said that visuals are absolutely necessary.
Finally, take into account that 30% of the marketers are creating their own visuals, well aware of the fact that originality works better in the long run.
In fact, Infographics, a type of original visual content, are shared 3 times more frequently than any other type of content.
3. Use visuals in order to attract attention
Visuals, as I have already said it, are a great way to attract the viewer’s attention and keep him or her engaged even if they are not interested at first in your topic. How can you do it and why does this matter?
Well, in order to capture someone’s attention with an image, you need not only to find the perfect image but at the same time, the most appropriate image for what message you want to send.
What types of visuals perform the best and attract the most of the users’ attention? According to Vengage, marketers believe that the Infographics are the best choice, followed by charts and data visualization.
Surprisingly, stock images are considered as being important by a rather small percent of the marketers.

4. Featured image for Google & Facebook
What do you mean, you will ask?
Why is a feature image important when it comes to Google and Facebook?
Well, let me explain it to you with just one word: IMPACT.
When you share one of your blog links on Facebook, the featured image will automatically be loaded. The result is a good looking Facebook post that is at the same time attractive and relevant. Otherwise, you will only get to share a link and perhaps a short sentence from the first paragraph of your blog post.
Considering how images impact the viewer, as we’ve already discussed in the first part of this article, you need to take into account how your links will look when shared on social media.
What about Google? Why are featured images important?
Maybe you already know it, maybe not. Just in case, I will remind you the fact that Google shows snippets of websites in their search results. They are available on the right side of the view screen.

According to the latest updates, however, if the web page has a featured image, Google will display it instead of a snippet.
This means that you have one more chance to make your blog posts more visible and more attractive, visually speaking.
The above screenshot is quite relevant in this case because we can clearly see that there are 7 different images/snippets featured on the right side of the screen.
Of course, many of the viewers will make their choices based on how appealing the image is as well.
5. Get backlinks
Another important thing regarding your blog images is the fact that they can generate links to your articles.
Even influential and popular bloggers will link back to you if your content is relevant or if you have great visuals to pair with your statements/statistics. Take for example the following screenshot taken from one of Neil Patel’s blog articles. He cites another blog, publishes one of their images and gives back a link to the original source. He does this in almost every blog posts he writes and publishes. And, he is not the only one.

This is a great way to grow awareness on your blog, get more readers and prove that you are relevant in your niche.
Sure, not all your blog posts will get backlinks from important websites like in the above example. However, take into account that all relevant links are good. Be patient, if your content is good, you’ll get to be linked by influential bloggers as well.
6. Create your own images
We’ve discussed so far how to use web images and why are they important to your blog. There’s still one question that remained unanswered. Where to find relevant images?
Well, if possible, the best way to get your visuals is to create them yourself. If you need graphs, charts, screenshots, and Infographics in your marketing campaign, start designing them right away.
Help Scout has an interesting and very useful guide on how to get started with your visual design. I suggest you to read it if you want to ever succeed in this aspect of your content creation process. For now, let me summarize the most important steps:
Create a visual identity.
Visuals will help you in your branding process and they will also give your blog brand a new identity.
It’s important to choose your colors, the type of visuals you are going to create and of course, to be consistent.
Make sketches. Many sketches. And then, design some more. You need to train your hand and your eye for this task. The more you explore in this area, the better you will get at drawing your own visuals.
Design your frame. Choose the size and shape of your visual and they way it will fit into your overall blog post. Combine shapes and vectors until your drawing begins to take shape.
Choose your colors wisely. Different colors can trigger different emotions. Also, take into account the overall visual identity of your blog and try to match everything you draw with it.
Your visuals should be able to compel people to click on your banners or read your blog posts.

7. Photography
On the other hand, if you need photos and product images, grab your camera and start shooting. Get outside, find beautiful and interesting places etc.
It’s easier now to create your own visuals for your blog. Digital cameras allow you to shoot as many photos as you need until you find the perfect angle, the perfect view, the perfect colors, and contrasts. Moreover, there are free tools available such as Fotor or Faststone that will help you adjust your photos and give them the professional look they need in order to capture the attention of the audience.
8. Create online graphics
If you want to be more efficient at creating your graphics or, if you don’t want to download and install third-party apps, you can choose to work with online tools. Online tools are a good choice because they are accessible from any device, regardless of the operating system in use.

There are many tools that you can start using right away, such as Bannersnack, PicMonkey or Snappa.
If you want to find out more about these tools and many other options you have, you can check my extensive guide to visual content tools that I’ve published recently on this blog.
9. Google images
One of the easiest ways you can get relevant visuals for your blog post is via Google Images. As you probably already know, Google provides you with an effective search engine for images that will help you find exactly what you need in just a few seconds.

However, pay attention to what images you choose to republish and from where. There’s a good chance the images you find on Google are already copyrighted. What does this mean and how to deal with this issue?
Well, I am going to answer all your questions in the following two paragraphs.
10. What you have to know about copyright
Copyright is a law that protects original works of authorship. Under this law falls almost everything we create and post online, provided that we do not renounce the right to copyright and publish under Creative Commons license or as public domain content.
Here are some things you should know about this law:
- Copyright attaches to an image, text, video or audio file as soon as the work is created and published in some form or another.
- You own the copyrights to your work even if you email it to a third party, provided that you specify that the work belongs to you.
- You do not need to file specific paperwork in order to get copyrights for your work. This right is automatically obtained by the owner/creator of the work.
- The owner of the copyrights can sell his or her work, reproduce it at convenience or, give it for free to third parties.
- If you are downloading Creative Commons images, read the license carefully. There are several types of CC licenses, and some of them carry certain limitations to how the copyrighted materials can be used.
11. How to use copyrighted images
Obviously, the best way to deal with copyrighted content is to pay for its use. It’s easy to deal with this issue when you buy stock images. However, when you are using other types of images, you need to adapt to the circumstances. Here are a few tips:
- Always link back to the page where you got your visual from if no other information regarding the use of the content is provided.
- If you download images from free databases, check whether or not the owners request to be mentioned and maybe, linked on your page.
- If you want to be one hundred percent certain you do not infringe copyrights of the owner, ask for permission to use their visuals.
12. Buy stock images
As I have mentioned in the previous paragraph, the best way to make sure you have the right to use a specific photo is to pay for it. There are many stock images websites available online. You can subscribe to all of them or, just the ones you favor.
The most popular stock websites are Dreamstime, Fotolia and Shutterstock. Here’s a full list with the top websites if you want to get informed about them before making your choices.
13. Top websites where you can download free images
A great option if you are on a tight budget is to search for images on free databases. There might not be as many options as there are on commercial stock images websites but if you arm yourself with patience, there’s a good chance you’ll find what you need.
Here’s a list of the top ten websites that offer free images for bloggers and marketers:
- Negative Space
- Death to the Stock Photo
- Unsplash
- StockSnap.io
- SplitShire
- Life of Pix
- Pexels
- ISO Republic
- New Old Stock
- Pixabay
14. Optimize images for Google
It’s good to always pair your text with relevant images whether you are using photos, Infographics or graphs. However, in order to maximize your success, you should also consider optimizing these images for Google.
1. Google values speed when it comes to website loading. Therefore, it’s important to optimize images for speed as well. What does this mean? Well, you need to make them as tiny as possible but without losing in quality.
First, reduce the original size. If your post area is for instance 800 pixels wide, there’s no need for a 2400 pixels wide image. Resize it to fit your blog.

Use TinyPNG to compress your images before uploading them to your blog. This tool will help you automate the entire process. You don’t need to know technical details about image processing, resizing or optimization. Just load your files and let it do everything for you.
2. What about the other type of optimization? How do you optimize images for SEO? There are three things you can do at this point.
- Rename the file
- Add a title
- Use Alt Text
The first thing you can do before uploading your file is to change its name. Choose something that contain your article main keywords.
Then, after uploading the image, add a Title and an Alt Text. The Alt tag will provide readers with a contextual description of that image.
You don’t need to include keywords here, if they do not describe the image. The Title is already enough for it. However, all these three steps will help search engine better index your files and it will help you get organic traffic.
15. Use the images in your blog posts:
I will conclude this article with one final chapter that will help you with one final task: the upload of your images on your blog. Since WordPress is the most popular content management system available today, I will show you how the work with images on WordPress only.
A. Upload and insert in a blog post (WordPress)
Go to your draft and click on the Add Media button.

Upload the file. You can search for the image on your local drive or, use the drag and drop feature if you already know where it is. Also, you can insert an image from a URL location.

Once an image is uploaded, you can either insert it into your post or, you can add it as a featured image.
B. Upload a featured image (WordPress)
To set an image as featured, just click on the Featured Image button/link available on the left side menu (see the above image).
Then, click on “Set Featured Image” button available on the right side of the screen, under the Tags section:

Conclusion
Visuals are very important for any website or blog.
If you want to be successful online, you need to always consider pairing your texts with relevant images, graphs, and charts that catch the eye of the audience and ease their understanding of what you are saying.
With this article, I tried to answer some of the most common questions people have regarding the use of images and where to find them, how to create them etc.
If you have anything to add to this list, please feel free to do it in the comments section available below.
Leave a Reply